Showing posts with label Shaker Windows. Show all posts

Wednesday, September 22, 2021

Shaker Christmas Card

Don't you just love an extra  pretty Christmas Card? Even better is making one to send to someone special! This is one of those cards. It's full of beautiful details to capture your eye.

I started with layers of cardstock and topped it off with paper from our Holly and Ivy papers. Next comes the shaker with all kinds of pretties to shake!

Using our special Thin Cut die I cut the back circle,  stamped a sentiment on it and glued to the card front. With our foam and acetate pack making the shaker is simple! Place the foam ring around the outside edge of the cardstock circle (save the other pieces of foam for other projects). Sprinkle your shaker pieces into the center of the circle. You don't need a lot, just enough to shake and still see the sentiment if you put one inside. Now peel off the film on the acetate and place on top of the foam. You've just make a shaker! 

Finally, place a decorative piece to complete the look. Here I used Glitter Paper. The shakers pieces are a combination of loose gems and sequins that go with the colors in the paper.


Z4309 Circle Shaker Window Thin Cuts

Z4310 Circle Shaker Window Foam + Acetate


X7273B Holly and Ivy Paper Pack

Other Close To My Heart products used to make this card.
  • Stamp Sets: Merry Christmas Flourish, Holiday Special
  • White Cards and Envelopes Value Pack (this is a GREAT deal!)
  • Cardstock: Harbour, Glacier
  • Exclusive Inks: Harbour
  • Specialty Paper: Harbour Glitter
  • Embellishments: Loose Gems: Candy Apple, Lagoon, Clear. Julep Sequins

If you need a Maker (consultant) I'd be happy to help.
If you'd like to BE a Maker I'd love to have you on my team!

Have you heard about our new VIP Customer Program? As a member you enjoy perks like a discount on your orders, FREE Stamp of the Month, special product bundles and online events. 

Before you go...... be sure to sign up to follow my blog so you don't miss any great ideas! The link is in the column on the right.


Michelle

#showandtellwithmichelle #ctmh #cardmaking #christmascards

Friday, January 8, 2021

Shaker Card ~ Color Dare #426

 With our new January/February catalog comes so many new things to create with! This card is one I made recently and am excited to share with you.

Our Design Team at Color My Heart Color Dare has a challenge for you where you pick at least 3 of the colors in our grid. You can use more of them if you like but you must use at least three. We also give you some free colors. We reference Close To My Heart colors but you can use any brand you have as long as you can make a very close match. Kind of close doesn't count.

Make any paper craft you like then use the link on our home page to join the challenge! We get you started by narrowing down the colors, you get to pick the rest of the details!

This stamp set: Heart Full of Love really caught my eye while paging through the catalog the first tine. I love that you can stamp in a heart shape and have so many other images to add to the mix! I couldn't resist making a shaker card for my first use of this stamp set.

It was easy to stamp the heart images and make the shaker. It all fits together perfectly! I used some beads and die cut hearts for the shaker element and accented the heart with a small spray of flowers. The hearts at the bottom were random stamped and the border at the top was colored with a shimmer brush. For the last step I used some Stickles to add some bling!


Heart Full of Love stamp set


Every Bit of Wonderful stamp set
Operation Smile--when purchased $7 is donated to the charity.

Heart Shaker Window thin Cut dies

Other Close To My Heart products used for this card.
  • White Cards and Envelopes Value Pack
  • Cardstock: White Daisy, Flamingo, Peacock
  • Exclusive Inks: Intense Black, Peacock, Flamingo, Lagoon
  • TriBlend Markers: Magenta Blend, Blue Turquoise Blend, Blue Turquoise Shades
  • Embellishments: Bright Bitty Beads, Goldenrod Stickles
  • Tools: Heart Foam & Acetate

If you need a Maker (consultant) I'd be happy to help.
If you'd like to BE a Maker I'd love to have you on my team!

Have you heard about our new VIP Customer Program? As a member you enjoy perks like a discount on your orders, FREE Stamp of the Month, special product bundles and online events. 

Before you go...... be sure to sign up to follow my blog so you don't miss any great ideas! The link is in the column on the right.

Now it's time for YOU to create and share. We love seeing what create! 

Michelle


#showandtellwithmichelle #ctmh #cardmaking #colormyheart #colordare

Friday, October 2, 2020

Floral Shaker Card ~ Color Dare #414

This week the Design Team at Color My Heart Color Dare has an Inspirational Photo jot use for your colors. The richness of the colors is beautiful and lends itself to many combinations!

Make any paper craft you like using colors seen in the photo. Do not add any colors to the palette that can't be seen in the photo. We're also giving you Black, White, Gold, Silver and any Neutral (browns, greys) to use. When you're ready use the link on our home page to join the challenge.

I decided to make a shaker card out of our new Floral Details & Background stamp set. This stamp set is so versatile for coloring in, embossing, stamping.....whatever you want to do! For this card I went with Gold embossing and coloring with a water brush and ink from the stamp pad lid. It softens the look of the colors in the photo but they are still all there!

Once I was finished with coloring I went to work on the shaker part. I used our special die to cut the circle frame and matching circle back.  The layers go together easily when you use the coordinating foam and acetate. Place the foam ring on the back circle, add the sequins, place the acetate on top of the foam circle and add the frame. Now it's ready for your project.


October Stamp of the Month - available only in October
Used for the sentiments 


Other Close To My Heart products used for this card.
  • White Cards and Envelopes Value Pack
  • Cardstock: White Daisy, Desert Rose, Blue Belle
  • Embossing: VersaMark pad, Gold Powder, Heat Tool
  • Exclusive Inks: Sangria, Desert Rose, Sage, Fern, Blue Belle
  • Embellishments: Sequins: Blue Belle, Rose Gold (retired)
  • Tools: Water Brush, Shaker Window Foam & Acetate
If you need a consultant I'd be happy to help.
If you'd like to BE a consultant I'd love to have you on my team!

Before you go....... be sure to sign up to follow my blog so you don't miss any great ideas. The link is in the left column. You can also find me on Pinterest and Facebook using the tabs in the header.

Now it's time for you to create and share! We can't wait to see what you create!

Have fun!
Michelle


#showandtellwithmichelle #colordare #colormyheart #ctmh #colorchallenge #cardmaking

Friday, January 4, 2019

Shaker Birthday Card ~ Tic Tac Toe Color Dare #324


We're starting 2019 off with our popular Tic Tac Toe Color Challenge!
It's easy and fun because all you have to do is pick a row, column or diagonal for your colors. You can even add one of the other colors to your row, etc. Or just use them all! For my card I used the bottom row and added Clover.

I was inspired by a card created by Becca Whitham. I changed the circle element into a shaker. I LOVE shaker cards! With our Shaker Window Kits it's soooooooo easy! There is a Thin Cut for the window and confetti, window foam and acetate and loose sequins to help you create your shaker. It's like a sandwich with the bottom layer being the back of the sandwich. I stamped one this one. Next comes the foam ring and the confetti and/or sequins. Now you close the sandwich with the acetate and you're done! Now you can adhere your shaker sandwich on a card or layout!

I also used some tiny Glue Dots to place a few of the sequins as accents above the shaker. For the Raspberry Twine once I tied it to the card I used a piercing tool to fray the ends for some fun texture.


Close To My Heart products
  • Stamp Sets: Years of Sweetness
  • White Cards and Envelopes Value Pack
  • Cardstock: White Daisy, Raspberry
  • Paper Pack: Oh What Fun
  • Exclusive Inks: Clover, Raspberry, Pixie
  • Thin Cuts: Decorative Borders, Shaker Window and Confetti
  • Shaker Window Foam and Acetate
  • Embellishments: Loose Sequins, Raspberry Twine
  • Glue Dots
  • Piercing Tool
If you need a consultant I'd be happy to help.
If you'd like to BE a consultant I can help with that, too.

Shakers are fun and easy to make. They can go on cards or layouts to add some unexpected fun!

Now it's your turn to create any paper craft using colors from the Tic Tac Toe grid above. Neutral colors are free but don't add any extra colors to the palette. Full details are in the post on our Color My Heart home page.

Have fun creating!

Michelle

#showandtellwithmichelle #colordare #colormyheart #shakercards

Thursday, October 25, 2018

Halloween Slime Kits with Shaker Windows!

Halloween Slime Kits with Shaker Window!

We are so excited to have the talented Amy Robison as a guest blogger today! Not only is she a contributing artist for Silhouette, but is also somewhat of an expert at designing children’s themed parties, gifts, and crafts. Don’t take our word for it, see for yourself!
Halloween Slime Party #ctmh #closetomyheart #shakerwindow #ThinCuts #Halloween #HelloPumpkin #shakercard #diy #kidsparty #kidshalloween
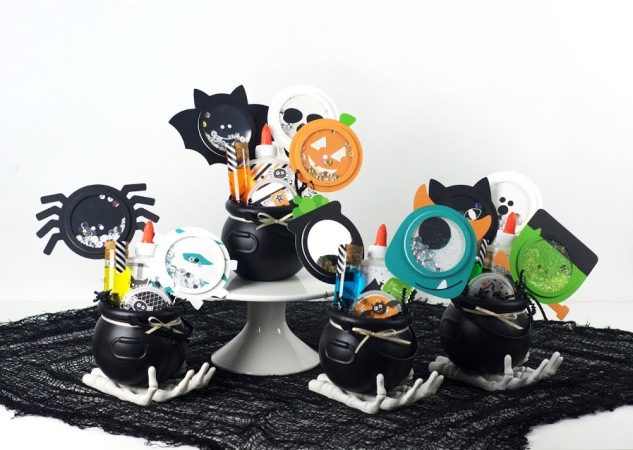
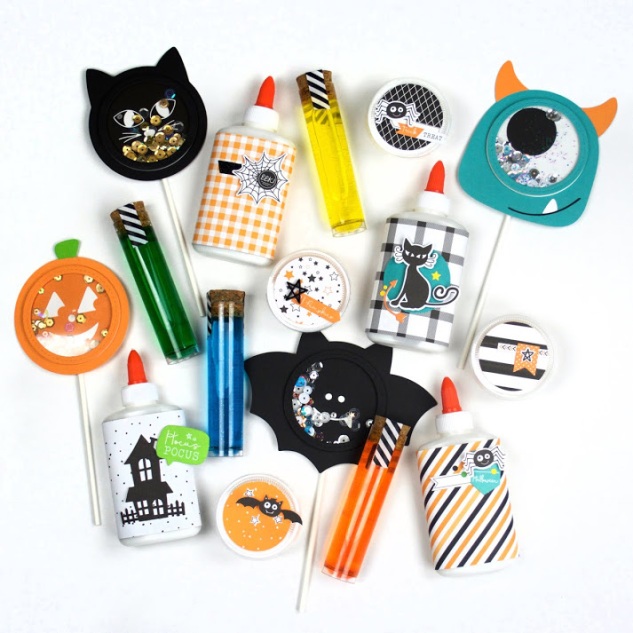
Hey! Amy Robison here! I’m so excited to share a fun party I created this week with the Shaker Windows & Confetti Thin Cuts, loose sequins, and Hello Pumpkin collection. If you follow me onInstagram stories then you already know that I am obsessed with the shaker windows after trying them out this week. I want to use them on everything! I already have a million ideas for Christmas. I’m getting a little ahead of myself, so I’ll calm down and focus on the party I’m sharing today— a slime making party. If you’re like me, then you hate this slime craze that has been going on for a few years. (It’s the worst!) Who started this? haha! My kids still love it though, so I decided that I just have to embrace it occasionally. Plus, how perfect is it for a Halloween party?
Halloween Slime Party #ctmh #closetomyheart #shakerwindow #ThinCuts #Halloween #HelloPumpkin #shakercard #diy #kidsparty #kidshalloween
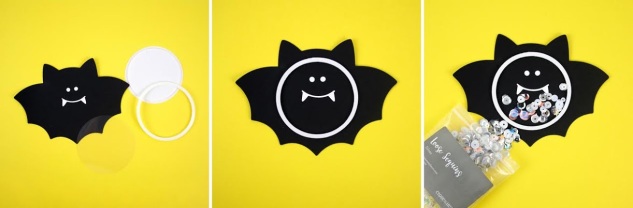
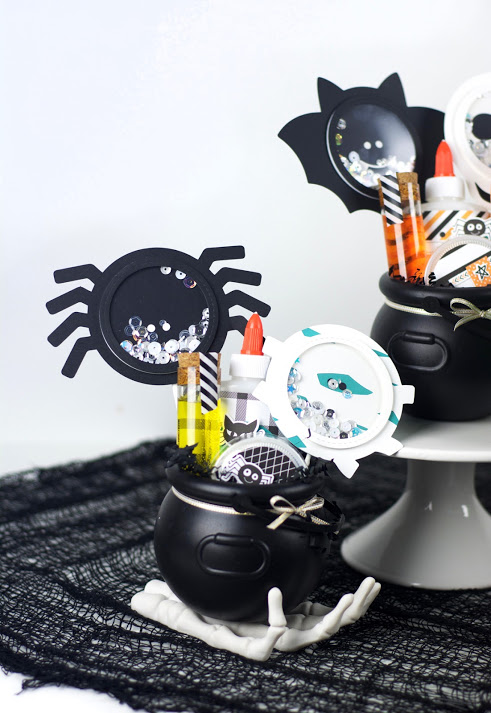
I started out by designing a few characters I could use with the shaker windows that would be festive for the holiday. I’m loving their simplicity and how they turned out. Once they were all designed, I added the shaker windows to each one. If you haven’t used the shaker windows before, I included a simple tutorial. They are a piece of cake and you’ll absolutely love them!
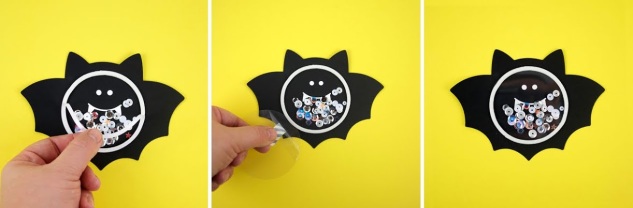
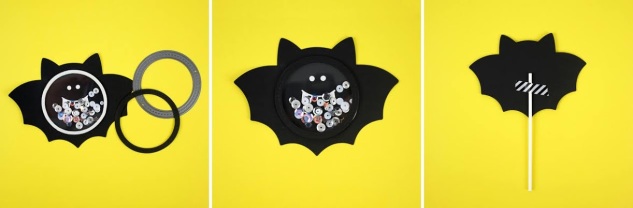
Shake Window Tutorial
Halloween Slime Party #ctmh #closetomyheart #shakerwindow #ThinCuts #Halloween #HelloPumpkin #shakercard #diy #kidsparty #kidshalloween
Step 1: Remove the outer foam ring leaving the middle square foam adhesive to use for other projects. (Such a genius design so all that empty space isn’t wasted.)
Step 2: Place the foam shaker window ring on your project. It is very sticky, so you know it will stay right where you put it!
Step 3: Fill with sequins, glitter, sprinkles or any other fun media. This loose sequins mix is so beautiful! I can’t get enough of it, and it’s available in gold too!
Halloween Slime Party #ctmh #closetomyheart #shakerwindow #ThinCuts #Halloween #HelloPumpkin #shakercard #diy #kidsparty #kidshalloween
Step 4: Remove the protective paper on the ring to reveal the adhesive.
 Step 5: Peel the protective film off of the acetate circle. Use washy tape to help peel it off. This was a little tip I learned from the Close to my Heart creative team. Such a huge help!
Step 6: Place the acetate sheet on top. Press down to make sure everything is sealed in place.
Halloween Slime Party #ctmh #closetomyheart #shakerwindow #ThinCuts #Halloween #HelloPumpkin #shakercard #diy #kidsparty #kidshalloween
Step 7: Using the Shaker Window Thin Cuts, cut out the finishing border in your choice of coordinating paper.
Step 8: Glue the border on top to finish.
Step 9: I taped a sucker stick to the back so that I could place them in my kits. These would be cute in gift baskets, too, as a tag to the recipient.
Halloween Slime Party #ctmh #closetomyheart #shakerwindow #ThinCuts #Halloween #HelloPumpkin #shakercard #diy #kidsparty #kidshalloween
Once I finished all the shaker window characters, I gathered the supplies for the slime kits. I used the Hello Pumpkin collection to wrap and embellish the supplies and containers to make them look more cohesive and “pretty” everything up a bit.
Halloween Slime Party #ctmh #closetomyheart #shakerwindow #ThinCuts #Halloween #HelloPumpkin #shakercard #diy #kidsparty #kidshalloween
Each kit has everything needed to make slime including fun sequins to mix inside to make it extra special. I love making each guest feel important and special. My guests are usually small children and I love the look on their faces when they see what is waiting on the table just for them. It’s the best and keeps me doing all these crazy parties.
Halloween Slime Party #ctmh #closetomyheart #shakerwindow #ThinCuts #Halloween #HelloPumpkin #shakercard #diy #kidsparty #kidshalloween
Have you used the shaker windows before? Hopefully I have sparked some ideas of fun new ways you can use them in your next project.

Dreamy Snowflakes Card ~ Color Dare Challenge #719

Each Friday we give you a new palette of colors to create with. For this challenge you must use all 3 colors shown in the graphic. We also a...