Showing posts with label vellum. Show all posts

Thursday, November 20, 2025

Brushed with Beauty ~ Card 2

 Are you ready for another look at the Brushed with Beauty Suite? This look will be very different from the look I shared on Tuesday! That's how versatile this Suite is! 

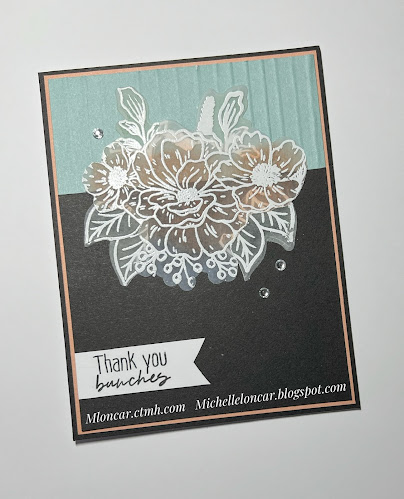
Using the bolder colors in the DSP I also went with softer colors like Petal Pink for the card base and the muted beige strips at the top. I also used Vellum to soften the layers between the DSP and focal flower. The flower is stamped and popped up on Stampin' Dimensionals. A bit of Beige Ribbon also adds to the soft look. The "ta-da" finish is the shiny dots I added to the flower center and around the flower. 


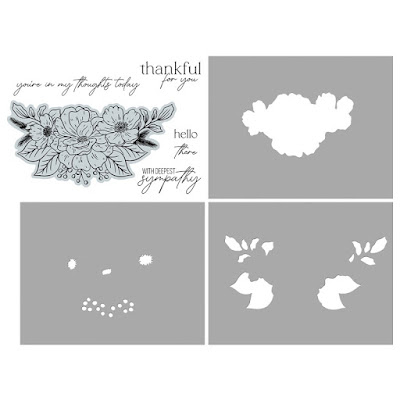
Here is a full look at all that comes in the Brushed with Beauty Suite. There are so many great products to create with in this suite! Two stamp sets with coordinating die cuts, a lovely embossing folder, Vellum and gems. Wow! What a great collection!

You can get the Suite now in whole at a 10% discount OR you can pick and choose the products you want. 
Colors in this Suite are: Calypso Coral, Darling Duckling, Early Espresso, Lost Lagoon, Mossy Meadow, Old Olive, Petal Pink Secret Sea and Very Vanilla. How's that for color options!


I hope you enjoyed this card and learning about the Brushed with Beauty Suite. You'll be seeing more I the coming days!


Michelle Loncar
Independent Stampin' Up® Demonstrator 
Images©Stampin' UP

#showandtellwithmichelle #brushedwithbeautysuite #cardmaking 

Friday, March 3, 2023

Vellum Floral Card

The Color Dare Challenge starting today has 4 colors to challenge you with using. You must use at least 3 of the colors. See the graphic below for the fine print.

This card is an inspiration seen on Pinterest. I decided to use Glacier, Melon and Sage on my card. Because the colors are applied to the back of the Vellum is can be hard to see some of the color. Sage is on the leaves with Melon on the flowers.

I Heat Embossed (VersaMark, White Powder, Heat Tool) the image on Vellum then applied the ink to the back of the image with our Blending Brushes and Exclusive Inks (colors listed above). After that the ink needed to dry because the Vellum is not porous like cardstock. Once dry I adhered it to a piece of Adhesive Sheet THEN cut it out with the coordinating Thin Cut Die. I took it a step further and fussy cut the leaves so it would fit on the card front better. I used the leaves to fill in around the flowers.

The layers of cardstock were applied to the card front. The card base comes from our Cards & Envelopes Value Pack which is a great item to have on hand. The piece of Glacier cardstock was dry embossed with a stylus/embossing tool to create some texture. Once all the layers were on the card I peeled off the last piece of backing on the floral image and placed it on the card front. A small sentiment and some Clear Sparkles finished the look.


Direct Link


If you need a Maker (consultant) I'd be happy to help.
If you'd like to BE a Maker I'd love to have you on my team!

Have you heard about our new VIP Customer Program? As a member you enjoy perks like a discount on your orders, FREE Stamp of the Month, special product bundles and online events. 

Before you go...... be sure to sign up to follow my blog so you don't miss any great ideas! The link is in the column on the right.

Michelle

#showandtellwithmichelle  #ctmh #colordare #colormyheart #cardmaking

Tuesday, March 10, 2020

March/April New Product Blog Hop

Welcome to our New Product Blog Hop for March and April! Do you love this 2 month cycle of new products and ideas? It sure keeps it fun doesn't it! The blog before mine is Brenda Lapp. Click on the links in each post to continue along on the hop. As it says on my layout....Enjoy the journey!

Like so many of us scrapbookers I am waaaayyyyy behind on scrapbooking my photos. It was fun getting around to these photos and remembering so many things about this dive trip. That's a nice part of scrapbooking, as you scrap your photos you get to relive the experience. 

I wanted to use our new Seas the Day papers for this layout and subject. I also knew I wanted to create a beach and water effect with some torn cardstock. I tore along the edge of the cardstock to reveal the white core. This gives a great wave look and also where it washes up on the beach. I added some pieces of pattern paper above for a background to the photos. 

After placing the photos on the layout I got busy with embellishing! I just LOVE the bottle in the Seas the Day - Cardmaking + Thin Cuts set. I stamped with pigment ink on Vellum and heat embossed with clear powder. I love how it turned out! The vellum gives the glass a slight frosty look and the embossing defines the edges nicely. The roll of paper inside the bottle is stamped and placed behind the bottle. The coordinating thin cut dies make cutting the bottle, shells and birds super easy! The final touch was to use a shimmer brush on the shells and outline the waves with Stickles for a bit of shimmer!


Close To My Heart products used on this layout
  • Stamp Set: Seas the Day - Cardmaking + Thin Cuts
  • Paper Pack: Seas the Day
  • Cardstock: White Daisy, Mink, Mint
  • Specialty Paper: Vellum 
  • Exclusive Inks: Sapphire, Intense Black, Julep, Mink
  • Embossing: Sapphire Pigment Ink, Clear Powder, Heat Tool
  • Watercolor Pencils, Water Brush (for the yellow shells)
  • Shimmer Brushes: Clear, Peach (for the shells)
  • Stickels: Diamond, Cool Mint
  • Journal Pen
If you need a consultant I'd be happy to help.
If you'd like to BE a consultant I'd love to have you on my team!

Now it's time to see what Brandi Robinson has created to share for our hop. Have fun and come back often for more great ideas!

Michelle

#showandtellwithmichelle #ctmh #scrapbooking #bloghops

Friday, February 9, 2018

Joyful Stars Blog Hop


Welcome to our months blog hop. If you came from Andrea's blog you're doing fine. Just click the link at the end of each post to continue on the hop.

This month I have been having a lot of fun with vellum! I made this card inspired 
by Marilyn Schleppy and I LOVE it! The softness the vellum adds to the images is so pretty. The images are silver embossed on the vellum and cardstock, then the vellum image is colors on the BACK for a soft look. With the matching Thin Cuts it was very easy to finish this card. 

TIP 1: I used White Pearls to embellish the card. Using the Turquoise Blue Shin Han Marker I colored the Pearls to match the colors in the butterflies. 
Tip 2: You need to hide the adhesive when using vellum. I put a glue dot behind the body of the butterflies where the embossing would hide it. For the vine I put it at the bottom knowing the overlapping butterfly would hide it.

Be sure to come back on Feb. 15th for the Technique Blog Hop. This month it will be devoted to Vellum and ways to use it!


All products are Close To My Heart:
  • Stamp Set: Chelsea Gardens-Cardmaking
  • Specialty Paper: Vellum
  • Pattern Paper: Chelsea Gardens
  • Embossing: Silver Powder, VersaMark pad, Heat Tool
  • ShiHan Markers: Sap Green, Leaf Green, Turquoise Blue
  • Cardstock: White Daisy, Fern
  • White Pearls
  • White Cards and Envelopes Value Pack
  • Glue Dots
If you need a consultant I'd be happy to help.
If you want to BE a consultant I can help with that, too.

Now hop over to Marie's blog and see what she created to inspire you this month!

Thanks for stopping by.

Have a great day!
Michelle

#closetomyheart #cardmaking #bloghop
SaveSave

What's Up Wednesday ~ Adopt a Pet ~ January 2026 Kit

Here is the Adopt a Pet Kit introduced in January. It is SO cute and would be fun to make with kids. My job as Kit Ambassador for our Team w...