Showing posts with label cards. techniques. Show all posts

Wednesday, February 25, 2026

What's Up Wednesday ~ Quilt Fold Card

Hello and welcome to my blog! Today I'd like to share a couple cards using the Quilt Fold Technique. It's fun. It's easy. It looks so pretty on your card!

Look at al those beautiful patterns! I also love the tone on tone corner die cuts. So pretty!


To start you need just a few pieces: 4" cardstock squares, 3" DSP square (2), 2" white square. Add to that a card base (4-1/4" x 5-1/5") and any accents you like. 

The DSP squares can be the same pattern or different like I used on my card. It's all up to you! On these cards I used the February Product of the Month: Painted Illusions.


To created the center design start with the DSP squares. Fold on the diagonal to create a triangle. Next fold back ONE corner to the fold. That's it! You can glue down the large triangle along the fold but leave the small one free. I added the corner die cuts at this point. Did I mention how much I love the tone on tone look they add?


Place the triangles on the 4" square lining the triangles up along the long fold. Slip the white square under the small triangles and glue down. Add an accent to cover the center.  

As a finishing touch I added some gold gems to go with the center ephemera. 


That's it! It really is simple and fun! Can you just imagine all the combinations we can use for this design? I think we could be busy for a long time! haha!

I hope you give this technique a try. I know you'll like it and impress whoever is the receiver of your card!

Michelle Loncar
Independent Stampin' Up® Demonstrator 
Images©Stampin' Up!

#showandtellwithmichelle #quiltfoldtehcnique #cardmaking #whatsupwednesday


Friday, February 6, 2026

Wooly Friends Bow Card ~ Color Dare #690

 Welcome to a challenge from our Color Dare Team. This challenge gives you 4 colors and you must use at least 3 of them. We also give you some Free colors to use with your main colors. Do not add any colors beyond that though.

Make any paper craft you like. When you're ready to join our challenge use the link below. Have fun!

I decided to make one of the Bow Cards I've been seeing and it was not only easy but fun. Here is how the layers need to be cut:

Pink piece: 2.5" x 5.25", Blue piece (cut 2): 1.75" x 5.25". Those are the pieces that create the magic. 

Glue the pink piece to the middle of the card base. Next, apply glue to the outer edge only of a blue piece and position to partially cover the pink piece. Do the same with the other blue piece. 

Now you gently fold back the inner edge of the blue piece just to the edge of the pink piece. Do that to all 4 inner blue pieces. You can glue down the folded section. 

Decorate a focal image that will cover the middle area of the design and embellish as desired. 

Did I mention this was easier than it looked? Play around with it and have fun with the colors and papers.


Direct Link to Color Dare #690

Here is how I finished the inside of the card. It's always fun to add a little extra with the sentiment.


I hope you are inspired to give this technique  try. It's a lot of fun and makes an impression! don't forget to give our color challenge a try too!

Michelle Loncar
Independent Stampin' Up!® Demonstrator 
Images©Stampin' Up!

#showandtellwithmichelle #colordare #colorchallenge #cardmaking #bowcard

Thursday, September 19, 2024

Brushed Metallic Changing Leaves Card

I really love the Changing Leaves Bundle! You can create so many different looks for throughout the year!  This look was inspired by Lisa Stenz. She created a wonderful design and I just had to put my spin on it. 

It's an easy card to make. The card front is embossed and the other leaves were die cut. The large leaf piece was washed with a bit of ink (Petal Pink and Boho Blue) and a water brush to go with the colors in the Brushed Metallic paper. the photo really doesn't do it justice.

See below for the products I used to make this card.

Create a cluster of leaves and pop up the sentiment with Stampin' Dimensionals. Add a little bow of linen thread to the stem. A few gems finish the look.

Changing Leaves Bundle


Dry Brushed Metallic DSP

A few more products that were used:

Give this look a try! I know you'll have fun and create a beautiful card to share with someone. 

Michelle Loncar

Independent Stampin' Up Demonstrator

#showandtellwithmichelle #stampinup #cardmaking #changing leaves

Wednesday, March 22, 2023

Liquid Pearls Cards

Today I'm sharing several more Liquid Pearl cards and I really love the look this technique creates. It's quite simple and the only hard part is waiting for things to dry.

Here is a trio of cards all using Liquid Pearls as a background for an image or senitment. The technique is simple....just squirt some Liquid Pearls on the cardstock. I used a tissue to then smear the Liquid Pearls around creating the backgrounds you see here. Sometimes I felt the need to a bit more color so I added more and smeared again. That's it....easy, right?!

Then the hard part...waiting for it to dry. If you don't have another project to work on during drying time you can use your heat tool to speed it up a bit. Next I stamped the images in Intense Black Exclusive Inks. Be careful when placing and lifting the stamp as the Liquid Pearls make the surface a bit slippery. Now the dry time wait begins again....or get the heat tool to help it along.

Finally I added some embellishments to accent the design and layered with cardstock to complete the cards.

Here's a list of products used to create these fun cards:

As I said, it's simple and fun to do and you get such an beautiful shine and look.

Don't forget it's Stamptacular Month! ALL stamp sets are on sale through March 31st!


CC2234 Daisy, Daisy Stamp Set
Only available through March 31st.

D2109 Flourished Layers

B1806 Flourished Greetings

If you need a Maker (consultant) I'd be happy to help.
If you'd like to BE a Maker I'd love to have you on my team!

Have you heard about our new VIP Customer Program? As a member you enjoy perks like a discount on your orders, FREE Stamp of the Month, special product bundles and online events. 

Before you go...... be sure to sign up to follow my blog so you don't miss any great ideas! The link is in the column on the right.

Michelle

#showandtellwithmichelle  #ctmh  #cardmaking #liquidpearls #specials

Wednesday, October 19, 2022

Floral Card ~ Technique: Distress Oxides

 Hi and welcome to a new project using Distress Oxide inks and a Stencil. I'm sharing this project with the  Heart 2 Heart Challenge: Stencil It. It's also part of the Technique Artwork Showcase for October.

I started with a stenciled background and Distress Oxide Ink. The link to the stencil is below. The Distress Oxide Ink colors used for this card are Speckled Egg, Candied Apple, Mustard Seed, Kitsch Flamingo and Mowed Lawn. The fun part about Distress Oxide inks is that they react to water! You can spray a mist and get a fine distressed look like I did, or you can splatter water and get a bolder look. Or you can even just stamp with the ink and not add water!

To apply the ink with  the stencil I used our new Bending Brushes. These brushes are amazing! You can get a nice soft look or use more pressure for a bolder look. Plus, it's a smooth look without edges!

The flowers were stamped with the Distress Oxide inks and cut out with the coordinating Thin Cut Dies. No fussy cutting needed! The yellow flower was misted with water and popped up on Thin Foam Tape. The sentiment comes from the Flourished Greetings set

Other products used: White Cards and Envelopes Value Pack, White Cardstock, Mist Glitter Paper, Freshly Baked Dots, Onyx Liquid Pearls.


Technique Showcase: Distress Oxides


If you need a Maker (consultant) I'd be happy to help.
If you'd like to BE a Maker I'd love to have you on my team!

Have you heard about our new VIP Customer Program? As a member you enjoy perks like a discount on your orders, FREE Stamp of the Month, special product bundles and online events. 

Before you go...... be sure to sign up to follow my blog so you don't miss any great ideas! The link is in the column on the right.


Michelle

#showandtellwithmichelle #ctmh #cardmaking #distressoxides #techniqueartworkshowcase


Friday, September 2, 2022

Split Circles Cards ~ Color Dare #512

 Friday is a fun day! It means a new Color My Heart Color Dare Challenge! This challenge is about picking at least 3 of the 5 colors in the grid below. DO NOT add any extra colors, especially if you're combining challenges. We are giving you some free colors to use with the grid colors: Black, White, Browns and Gold. 

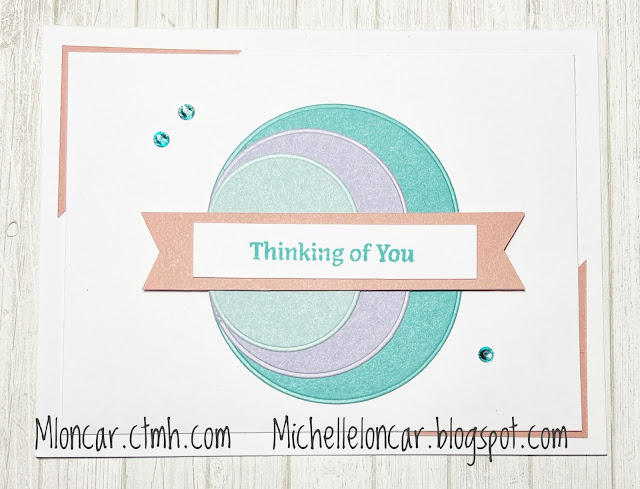
I decided to use Lagoon, Glacier, Wisteria and Desert Rose for my project. I've been seeing the Split Circles again and remembered how fun it is to make. So I got out my Thin Cut Circles and got busy. 

Once I cut my circles I needed to decide how to layer them. You can center, line up left or line up right. I decided to mix mine up since I was making two cards.  So to get started I grabbed a couple card bases from our White Cards & Envelopes Value Pack. This is a GREAT deal! You'll always be ready to make a card with this on hand.


Color My Heart Color Dare

For the first card I lined up both half circles on the left. Since I was using a banner across the middle I left a gap for the banner to cover. This makes the circles now looks like ovals! I added a pop of color in the corners. the Clear Sparkles were colored with a Triblend Marker (Blue Turquoise Blend) to keep the color theme going. The banner is popped up with some Foam Tape.


For my second card I lined up one hand circle on the left and the other half circle on the right. When you place them on the card line up the middle color to create a flourish look. Again I left a gap between the circles for the banner to cover. This lets you see more of the circles. This time the banner is Glitter Paper (Desert Rose). I also die cut a small circle for the sentiment. Both the banner and sentiment circle are popped up with Foam Tape. For the Clear Sparkles this time I colored them with a Purple Blend Marker.


Circles Thin Cuts
Backyard Bliss
Cardmking

If you need a Maker (consultant) I'd be happy to help.
If you'd like to BE a Maker I'd love to have you on my team!

Have you heard about our new VIP Customer Program? As a member you enjoy perks like a discount on your orders, FREE Stamp of the Month, special product bundles and online events. 

Before you go...... be sure to sign up to follow my blog so you don't miss any great ideas! The link is in the column on the right.


Michelle

#showandtellwithmichelle #ctmh #cardmaking #colordare #colormyheart

Monday, August 22, 2022

Crisp Air Pumpkin Card ~ Atlantic Hearts 487

 Welcome to our newest Atlantic Hearts Sketch Challenge! Our Design Team supplies the sketch to get you started on any paper craft you like. You can rotate, flip, etc the sketch. We just need to be able to see it in your project.

I couldn't wait to use this stamp set and paper packet! I played around a bit with the different patterns for the  pumpkin and finally decided on these two. Using the Thin Cut dies makes it super easy to cut out the shapes, too. 

The Crisp Air papers have beautiful colors and patterns! It took me some time to decide which ones to pair together for this card. It would have been an option to use a piece of solid cardstock in place of one of the pattern papers but I love this combination of papers. In order to make the layers stand out a bit more from each other I inked the edges giving it a nice crisp and defining edge. To do that I simple scraped the edge of the paper across the ink pad

The base for the card is from our Cards and Envelopes Value Pack. This is a great deal and you'll have a nice stash of cards just ready for those times you need one! 

Atlantic Hearts Sketch Challenge

The pumpkin pieces were stamped on Nectarine cardstock with Paprika Exclusive Inks. Pine ink for the stem and Sapphire ink for the tag were also used. The edges were inked with Paprika ink, too. There is a little piece of Thin Foam Tape under the end of the banner and the tags. Gold Glitter Dots make the finishing touch!


If you need a Maker (consultant) I'd be happy to help.
If you'd like to BE a Maker I'd love to have you on my team!

Have you heard about our new VIP Customer Program? As a member you enjoy perks like a discount on your orders, FREE Stamp of the Month, special product bundles and online events. 

Before you go...... be sure to sign up to follow my blog so you don't miss any great ideas! The link is in the column on the right.

Now it's your turn to  create something to share. We can't wait to see what you make!


Michelle

#showandtellwithmichelle #ctmh #cardmaking #atlanticheartssketchchallenge

Monday, August 15, 2022

Interactive Cards ~ Core Catalog 2022-23

 Our NEW Core Catalog is now live for the next year. There are so many goodies in this catalog it was hard to pick something to create with for this Artwork Showcase. 

I decided to feature our new interactive Pull Tabs. This Pull Tab (link below) makes it super easy to create a fun surprise in your card making. 

The paper packet is Celebrating You (link below). These papers are somewhat generic in that they can be used for male or female paper crafts. There are 12 fun patterns in lovely colors. 

A few products I used to create this look are the following: Exclusive Inks (Intense Black, Lagoon), TriBlend Markers (Aqua Blend, Gold Yellow Blend), Black & White Dots (colored with marker), Stickles (Goldenrod), Foam Tape and Glue Dots.

The Pull Tab dies come with an instruction sheet helping you to create the slider mechanism. I have all kinds of ideas floating around my head for using this die cut! Stay tuned for more ideas to come!


Z4640 You Deserve it All + Thin Cuts
Z4613 Pull Tab Thin Cuts


X8032C Celebrating You
Coordinating Cardstoc

X8032S Celebrating You Paper Packet
+ Stickers


If you need a Maker (consultant) I'd be happy to help.
If you'd like to BE a Maker I'd love to have you on my team!

Have you heard about our new VIP Customer Program? As a member you enjoy perks like a discount on your orders, FREE Stamp of the Month, special product bundles and online events. 

Before you go...... be sure to sign up to follow my blog so you don't miss any great ideas! The link is in the column on the right.


Michelle

#showandtellwithmichelle #ctmh #artworkshowcase #interactivecards 

Friday, June 24, 2022

Shaker Card ~ Color Dare #502

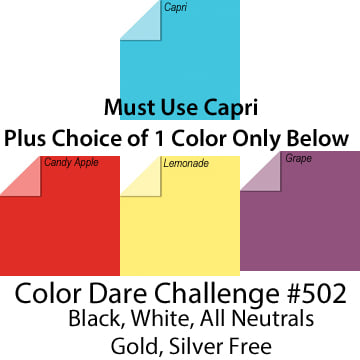
 Our Design Team at Color My Heart Color Dare has a new color challenge for you. For this challenge you must use the color Capri. Then pick ONE of the colors below to pair with Capri. There are some free colors you can also use. 

We reference Close To My Heart colors but you can use any brand you have as long as you can make a very close match. Kind of close doesn't count. Make any paper craft you like. When you're ready to join the challenge use the link in the post on our home page

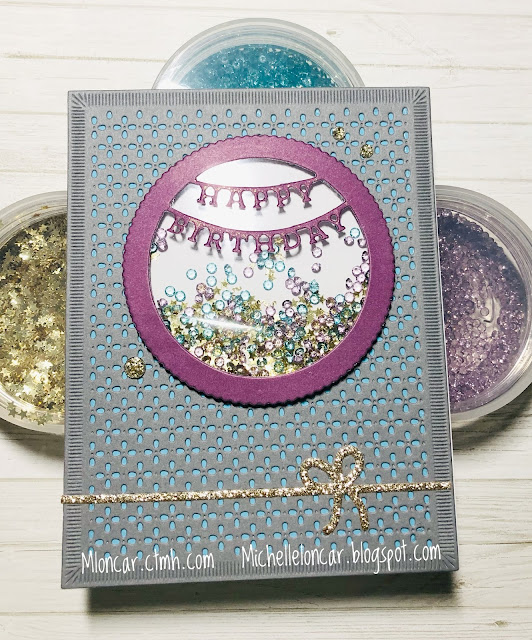
I paired Capri with Grape for my card. I also used a Neutral called Pewter along with White Daisy. You can see all our beautiful cardstock colors here.  The card base is from our White Cards and Envelopes Value Pack.  This is a must have item! You'll be ready to make a card any time you need one!

Using several of our Thin Cut Dies I created the background and the frame from the shaker element. You can see them below.  The Bow is from a retired Thin Cut Die. 

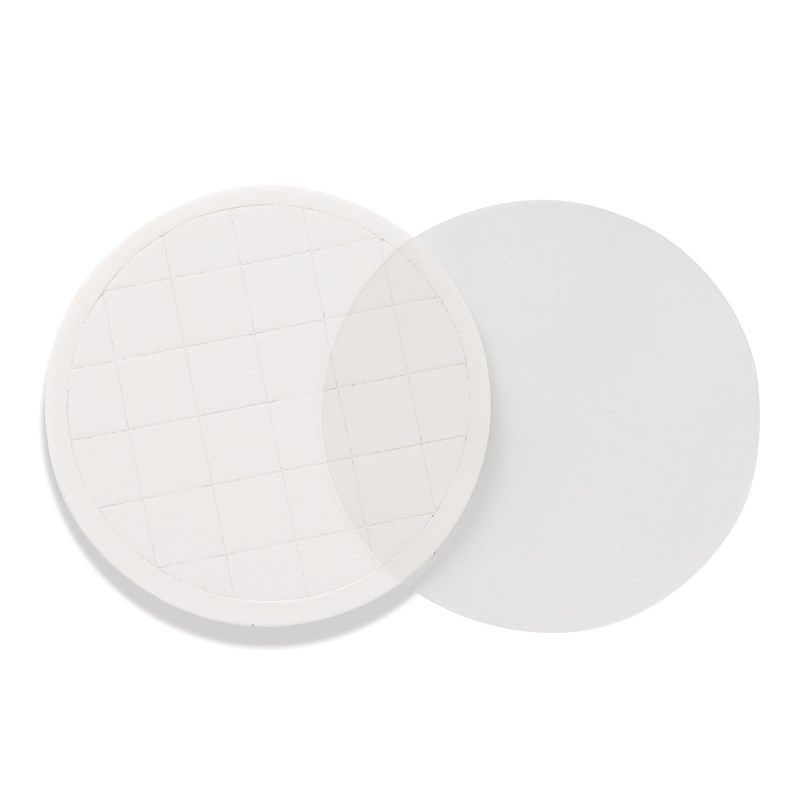
For the shaker part I used a couple colors of our Loose Gems. They are so pretty! I also added some Gold Star Confetti for fun. Using the foam + acetate (see below) makes it easy to construct a shaker element!

I added a few Gold Glitter Gems and painted the Happy Birthday with a Gold Shimmer Brush to finish the look.


If you need a Maker (consultant) I'd be happy to help.
If you'd like to BE a Maker I'd love to have you on my team!

Have you heard about our new VIP Customer Program? As a member you enjoy perks like a discount on your orders, FREE Stamp of the Month, special product bundles and online events. 

Before you go...... be sure to sign up to follow my blog so you don't miss any great ideas! The link is in the column on the right.

Now it's your turn to pick your colors and create something to share. We can't wait to see what you make!


Michelle

#showandtellwithmichelle #ctmh #cardmaking #colordare #colormyheart


What's Up Wednesday ~ Scenic Coast Card

How are you today? Are you feeling crafty and creative? Feeling like you need a bit of inspiration? Maybe this idea will help you out. I saw...