What do you know about stencils? Do you know how to make and use them? Do you know how many different ways there are to use stencils? This month our group of consultants are going to show you different ways to make and use stencils!
The blog before mine is Judy Faye Garner. Click the link in each post to hop to the next blog. It's that easy!
For my stencil project I wanted to create a layout using this beautiful photo of my granddaughter. This idea gradually formed in my mind and I'm happy to say it turned out just as imagined!
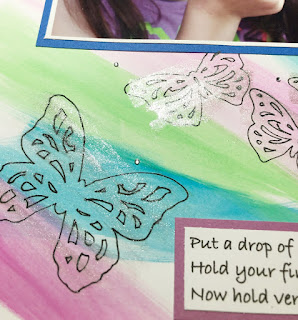
I started by doing a watercolor wash for the background using colors from the photo. The blue is obvious but I also pulled some of the less obvious colors like what you see in her shirt and the grass. It all comes together for a nice bright look! I used our Wide Water Brush and our Watercolor Paint to create the background. Using a water brush makes it easy and for me less chance of spilling a cup of water over my desk! I LOVE water brushes!
I tried each of the colors for the base of the layout and decided on Green Apple. I used Bluebird and Thistle for the mats on the layout. As the watercolor was drying I moved to my Cricut to make the stencils.
Hey... did you know I am now a Cricut Affiliate? Just click on the Cricut logo in the upper right column and you'll have access to ALL Close To My Heart Cricut Collections.....both current AND retired! From that page you can also access everything Cricut beyond Close To My Heart!
I used butterflies from a variety of our Close To My Heart collections. When I got to the Image page for my project I typed in butterflies and limited the search to purchased. Then I just picked the ones I liked for this project. I cut them in various sizes on cardstock for a nice balance. We also have a pack of stencil sheets when you know you want a stencil to use multiple times. When I was ready to use the stencil I laid the cut outline where I wanted it and used the Black Journal Pen .01 to trace the outline of the butterfly. Next I laid the cut butterfly inside the outline I just penned and traced all the detail cuts for the butterfly. I ended up with a butterfly full of color from the watercolor wash in the background! After I was done with the butterfly stencils I used the Clear Shimmer Brush over each butterfly for some sparkle. Some Bitty Sparkles also added a nice touch. The journalling was done on my computer and printed on cardstock.
If you need a consultant I'd be happy to help.
If you'd like to BE a consultant I'd love to have you one my team!
Next blog on our hop is Haley Dyer. Be sure to hop over and see more great stencil ideas!
Before you leave my blog be sure to sign up to follow me so you don't miss out on more great ideas! Or you can click the tabs at the top of the blog to follow me on Facebook or Pinterest.
Thanks for stopping by!
Michelle
#showandtellwithmichelle #ctmh #techniquebloghop #scrapbooking


Sweet layout and such a cute picture!!!
ReplyDeleteThanks, Haley.
DeleteGreat layout and the love the shading you used.
ReplyDeleteThanks, Judy
DeleteWhat a great technique you shared here using stencils. You layout looks great.
ReplyDeleteThanks, Maz
DeleteClever to trace the stencils creating multiple butterflies. Adorable picture.
ReplyDeletethanks, Darlys
DeleteGreat layout! I like how you traced the butterflies.
ReplyDeleteThanks, Cat.
DeleteLove this technique - thanks for the explanation. Beautiful layout.
ReplyDeleteThanks, Alyson
DeleteLove the tracing idea with the stencils!
ReplyDeleteThanks, Lauren
DeleteThat picture has got to be the cutest one I've seen in a while. Great story.
ReplyDeleteThanks, Casandra
DeleteI'm so glad you used such a great picture in such a nice size to capture this dear face and moment!
ReplyDeleteThanks, Mary. It's one of my favorite photos!
Delete