Showing posts with label scrapbooking. Show all posts

Friday, December 19, 2025

Scrapping Black & White Photos ~ Color Dare #684

 For our end of the year Color Dare Challenge we give you two challenges both starting today and running through until Jan. 2nd. Since it's such a busy time of year this gives us a bit of a break but still lets you escape to the craft room for some needed peace, quiet and crafting time!

Color Dare #684 is all about using Pastel colors. Don't let any Bold colors sneak into your project! The Bold colors belong on Color Dare #683! We do let you use some Free colors: black, white, neutrals and metallics. But that's it....Pastels and the Free colors!

Wednesday I started this post about scrapping black and white photos. I showed the left page then and promised the right page for the challenge going live today. The first photo shows you the full double layout with a total of 4 photos. The design I created keeps it fairly simple with the pink accenting the black, gray and white of the photos. 

Let's scroll down and take a closer look at the right page.


I had 3 photos to finish this layout. Two are vertical and one horizontal. I played them out in different ways and ultimately decided to go with a collage style look . I trimmed off the extra parts that detracted from the photos, put a bit of adhesive on the back to tack them in place then got busy adding the floral accents I had left over from the left page.

Since there are 3 photos on this page I kept the flowers in smaller clusters and only placed them in 3 spots. This kept the theme of three going and you can still see the triangle in the relationship of the photos and ht flower clusters. That creates a nice balance look your eyes love. 

I did a small journal strip for this page and blended the color around the outside edges like on the la=eft page.  Click here to read more about how I made the left page.

Right side page 

Left side page

Close-up of flower cluster

Direct link to Color Dare #684

Have fun with our Pastell Color Challenge! We can't wait to see how you're inspired by this palette!

Michelle Loncar
Independent Stampin' Up® Demonstrator 
Images© Stampin' Up

#showandtellwithmichelle #colordarechallenge #colordare #colorchallenge #scrapbooking

Wednesday, December 17, 2025

What's Up Wednesday ~ Scrapping Black & White Photos

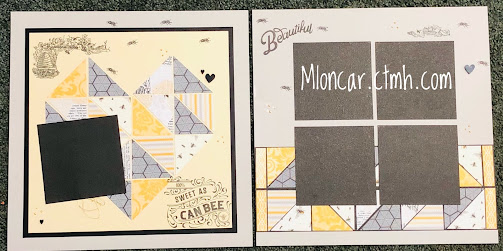
Today I want to share with you how to use Black & White photos in scrapbooking. Since there are no additional colors to use for inspiration you can go in a lot of directions with color. For this layout I decided to use pink to accent the photo for two reasons: I like how pink looks with black and gray tones and I needed a project using pastel colors for a Color Dare Challenge going live on Friday. Some other colors to go with black and white could be red, blue, yellow or even just stay with a black and white theme!

Before I even sat down I envisioned this photo with a half circle of flowers on one side. the base is a piece of 12" x 12" Two Tone Pretty in Pink cardstock. I used the lighter side to create a contrast with the ink.

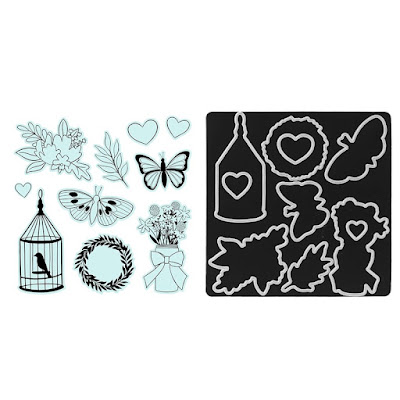
The stamped and die cut flowers are in two sizes from the Petals of Beauty Bundle using  the same Pretty in Pink but on the darker side of the cardstock. I also die cut some Vellum leaves to tuck around the flowers. I love how Vellum is such a great supporting actor in a design. Some of the flowers are popped up on Dimensionals and all the flowers have a pretty, sparkly Rhinestone in the center.

I used a Mini Alphabet die to cut a title which fit perfectly along the right edge of the 5" x 7" photo. My journalling was printed on Pretty in Pink cardstock.

After all of this the layout still looked plain and unfinished. There was so much pink space! I thought about stamping some flowers around the out area but I thought that would look to busy and take your eye away from the focal point...the photo. As you can see I ultimately decided to shade around the outside with a blending brush, this time using Flirty Flamingo ink as there wasn't enough contrast using the Pretty in Pink ink. By shading around the outside of the page it created a vignette effect where there is a shadowed perimeter going into a brighter center. It naturally draws your eye to the center!

The quality of the photo isn't the greatest since it's so old, but sometimes you have to work with what you have. The important part is getting the photo in a scrapbook so it can be enjoyed and passed on to future generations.

Right now I'm working on the right page for this double layout. Come back Friday to see the completed double layout and how I scrapped 3 black & white photos for page 2.


Close-up of a flower cluster


Thanks for dropping in for What's Up Wednesday!

Michelle Loncar
Independent Stmapin' Up® Demonstrator 
Images© Stampin' Up

#showandtellwithmichelle #whatsupwednesday #scrapbboking #blackandwhitephotos


Thursday, October 23, 2025

Season of Memories Scrapbooking

Relive the joy of the holidays with the Keeping Traditions Scrapbooking Workshop Kit! This kit makes three gorgeous two-page layouts with festive papers, traditional Christmas designs, and charming embellishments. Try the optional glitter brush technique featured in this kit!

The Holidays are such a busy time of year so get a head start on your Holiday scrapbooking by having your layouts all ready to go! Just add the photos later.

The Keeping Traditions Scrapbooking Kit makes these three layouts.....or you can go rogue and do your own thing with the products supplied in the kit!
Keeping Traditions Scrapbooking Workshop Kit

Michelle Loncar
Independent Stampin' Up® Demonstrator 
Images©Stampin' Up


#showandtellwithmichelle #scrapbooking #scrapbookingworkshopkit #keepingtradtions

Tuesday, July 15, 2025

Make a Memory Scrapbooking Kit


Capture life’s moments with the Make a Memory Scrapbooking Kit! This all-inclusive scrapbooking kit makes it easy to document everyday memories with coordinating papers, embellishments, and stickers in a versatile, all-occasion style. With everything you need in one set, creating meaningful pages has never been simpler!


Michelle Loncar
Independent Stampin' Up® Demonstrator 
Images© Stampinup

Wednesday, February 26, 2025

Everyday Happiness Layout

I love how this layout turned out! The Everyday Happiness DSP spoke to me as soon as I saw it and I waited to use it until I found the right photo. This one of my sweet granddaughter was perfect and the layout came to life! What do you think? 

I used a layout inspiration from Pinterest to get started and from there it came together easily. I used a variety of supplies in my stash to create this look. I'm sure you must have similar items in your stash but just in case some of these catch your eye I've included links below.

This is a good example of not using typical colors for flowers. Taking my color cue from the papers and photo I decided to go with the brown tones for the flowers. I did use a yellow tone for the small flowers but honestly I'm not a big fan of yellows so I kept it as an accent. 

I love how the arches look along the right side and show off patterns in the pack. The die cut heart is a perfect accent to tie in the left side florals.  I think this is one of my favorite layouts ever!


Everyday Happiness DSP

Textured Floral Stamp Set


Textured Floral Dies


Everyday Arches Dies


Heart Shaped Bundle

A few basic products also used:

Thanks for stopping by. I'd love to hear what you think of this layout. 


Michelle Loncar
Independent Stampin' Up Demonstrator 

#showandtellwithmichelle #layouts #scrapbooking #everydayhappiness

Friday, April 21, 2023

Spring Layout ~ Color Dare #545

 Are you ready for a new color challenge from the Design Team at Color My Heart? Well we're ready to go if you are! This week we offer 5 colors for you to create with.....you MUST use at least 3 of our colors. See the graphic for the fine print rules of our challenge.

We reference Close To My Heart colors but you can use any brand as long as you can make a very close match. Kind of close doesn't count. Make any paper craft you like and when you're ready to join our challenge click here for the direct link.

I wanted to scrap these photos of my grandkids and dug around in my stash for the colors I needed for both  the photos and our challenge. The Avocado color in the background and the Lagoon and Glacier in the dress are the colors that inspired me most so that's what I went with. I had to go back in my stash a bit to find these retired papers that were perfect! The papers are retired but you can still get the Life in Bloom Picture My Life Cards and Digital Art.

The layout is not my usual style. I tend to go with a more CAS style....clean and simple. But the boldness of color in the photos stands out from all the "busyness" of the papers so this time it works. I used a pattern from one of our How-to Books to get started and loved the bold lines of the design. The pattern gives you all the measurements, samples and placement info you need to create a stunning layout. Psst.... we have patterns for card makers, too!

Here are the products I used for this layout:


A Clear Shimmer Brush was used on the flower stickers to give a bit of bling along with the sparkles. I also popped up with Thin 3D Foam Tape some of the stickers for dimension. 


Color My Heart Color Dare #545


If you need a Maker (consultant) I'd be happy to help.
If you'd like to BE a Maker I'd love to have you on my team!

Have you heard about our new VIP Customer Program? As a member you enjoy perks like a discount on your orders, FREE Stamp of the Month, special product bundles and online events. 

Before you go...... be sure to sign up to follow my blog so you don't miss any great ideas! The link is in the column on the right.

Michelle

#showandtellwithmichelle #scrapbooking #layouts #colordare #colormyheart #colormyheartcolordare

Wednesday, April 19, 2023

Simple Layout

 I saw a one page layout by Heidi Trembly that inspired me to create my own version. I made mine a double layout and am so pleased with the way it turned out! thank you Heidi for the inspiration.

The stamp set is CC32316 Parisian Notes (retired) from a recent special. It's no longer available so if you have it, lucky you! If  not you can still recreate this look with other stamp sets. 

I stamped in Intense Black Exclusive Inks on White Daisy Cardstock because I wanted to prevent bleeding when I used the marker. The TriBlend Marker I used is Ice Blue Blend. These markers come with 3 shades of the color in the same barrel. You can create some really great depth of color using these shades when coloring. In this case I just used the darkest shade for my flowers, taking my inspiration from the sky.

The journaling was done on my computer because my handwriting has become so messy. For the title I picked out a font that allowed me to add a touch of color. I also stamped some extra flowers, fussy cut them and added to the layout.

Clean and Simple..... sometimes less is more impressive!


If you need a Maker (consultant) I'd be happy to help.
If you'd like to BE a Maker I'd love to have you on my team!

Have you heard about our new VIP Customer Program? As a member you enjoy perks like a discount on your orders, FREE Stamp of the Month, special product bundles and online events. 

Before you go...... be sure to sign up to follow my blog so you don't miss any great ideas! The link is in the column on the right.

Michelle

#showandtellwithmichelle #scrapbooking #layouts 

Monday, December 12, 2022

Christmas Layout ~ Atlantic Hearts Sketch Challenge #503

Welcome to a new sketch from our Team at Atlantic Hearts Sketch Challenge! Use our sketch to create any paper craft you like. You can flip, flop, rotate...whatever you like. We just need to see our sketch in your project. When you're ready to join our challenge use the link below the graphic. This challenge opens on Wednesday, Dec. 14th.

I envisioned this sketch as a layout and it didn't disappoint! Using the Christmas Story papers and a base of Harbour cardstock I got busy putting my idea together. The images are from The Merriest Season stamp Set + Thin Cuts. Exclusive Ink colors are: Harbour, Pine, Sage and Scarlet.  Cardstock colors are: Harbour and White Daisy. A thin strip of our Gold Glitter Paper was also used to add some bling.

I also used some Thin Cuts dies to create the bow and the tag. The Small Bow Thin Cuts and the Tags & Tabs Thin Cuts make adding this type of detail quick and easy. Finally, I used  Gold Metallic Paint Markers to add some little touches around the pages.


Atlantic Hearts Sketch Challenge


Christmas Story Paper Packet

If you need a Maker (consultant) I'd be happy to help.
If you'd like to BE a Maker I'd love to have you on my team!

Have you heard about our new VIP Customer Program? As a member you enjoy perks like a discount on your orders, FREE Stamp of the Month, special product bundles and online events. 

Before you go...... be sure to sign up to follow my blog so you don't miss any great ideas! The link is in the column on the right.

Michelle

#showandtellwithmichelle  #ctmh #atlanticheartssketchchallenge #scrapbooking

Saturday, January 15, 2022

Technique Hop ~ Let's Get Geometrical

 Welcome to our first Technique Blog Hop of 2022! This month we're sharing a geometric theme and ways to use them in your paper crafting. The blog before mine is Brandi  Robinson. Just click on the links in each post to hop to the next blog. 

My layout is inspired by one done by Tonya Sheridan. I love this heart shape made from triangles of pattern paper! I stamped images around the pages and accented with some Liquid Pearl dots and tiny hearts. By the way.... our new Wood and Acrylic Shapes are thinner than they used to be! They are so much more user friendly on projects in this new thinner dimension!


I cut the paper into 2" squares then cut on the diagonal. To create the heart I started at the bottom placing the first two triangles 1/2" up from the edge and at the middle point of that layer. Here are the layer sizes: 12" base is Mink CS, Black CS is 10 1/2" and the yellow CS is 10". After you get the first two bottom triangles placed the heart comes together pretty easy! Just follow the pattern you see in the photo.


The right page also uses the triangle idea but in a different way. It's a border created on a piece of black CS that is 4 1/4" x 12". The narrow pieces at the ends come from the Zip Border on the pattern paper. 


Other Close To My Heart products used on this layout.
  • Cardstock: Mink, Black, Shortbread
  • Exclusive Inks: Black
  • Embellishments: Bisque Pearls, Gold Thread

If you need a Maker (consultant) I'd be happy to help.
If you'd like to BE a Maker I'd love to have you on my team!

Have you heard about our new VIP Customer Program? As a member you enjoy perks like a discount on your orders, FREE Stamp of the Month, special product bundles and online events. 

Before you go...... be sure to sign up to follow my blog so you don't miss any great ideas! The link is in the column on the right.

Now it's time to hop to the next blog. It belongs to Cat Nowak.


Michelle

#showandtellwithmichelle #ctmh #scrapbooking #techniquebloghop #layouts

Sunday, August 22, 2021

Lovely Layout

 Today I'm sharing a layout I made for my August Scrapbook Classes. It features the Lovely paper pack and two stamp sets with Thin Cuts. They are retiring August 31st but you might find them on my website under Online Only until supplies run out.

The layout base pages are Linen cardstock using the light side. Papers are from the Lovely pack and trimmed with a Thin Cut Border. There are various embellishment clusters around the pages featuring images from the stamp sets, die cut flowers and other embellishment accents. The pages were splattered with a Shimmer Brush and dotted with Stickles. 


Left page 


Right page

Below are photos of the embellishment clusters.


The flowers were lightly colored with a water brush and ink. 

The butterfly was colored with Shimmer Brushes.

Smiles from the Garden Stamp Set + Thin Cut Dies

Florals & Flutters Stamp Set + Thin Cut Dies

Lovely Paper Pack

Other Close To My Heart products used for this layout.
  • Cardstock: Linen
  • Exclusive Inks: Intense Black, Blue Belle, Ballerina, Sage
  • Embellishments: Blue Belle Pearls, Blue Belle Shimmer Brush, Flamingo Shimmer Brush, Ice Blue Stickles, Wood Hearts
  • Thin Cut Dies: Small Bow, 3-D Flowers, Fancy Borders
  • Tools: Thin 3D Foam Tape, Water Brush

If you need a Maker (consultant) I'd be happy to help.
If you'd like to BE a Maker I'd love to have you on my team!

Have you heard about our new VIP Customer Program? As a member you enjoy perks like a discount on your orders, FREE Stamp of the Month, special product bundles and online events. 

Before you go...... be sure to sign up to follow my blog so you don't miss any great ideas! The link is in the column on the right.


Michelle

#showandtellwithmichelle #ctmh #scrapbooking

Friday, January 1, 2021

FREE Scrapbook Pattern!

 Everyone likes FREE and here is a scrapbook pattern to get you started in the New Year!


The Blossom collection features the same classic paper designs that made it popular the first time it was available, with a refreshed color palette and several coordinating products, including a new sticker sheet, a coordinating cardstock packet, and two My Acrylix® stamp sets! Save 20% with the Blossom Product bundle, which contains each of these special items or with the Blossom Workshop Kit, which includes materials for creating scrapbook layouts and cards using this great paper collection!

Blossom Paper Pack + Stickers


Shower Flowers


Cherished Blossoms

And now for your FREE pattern! This pattern makes a 12" x 12" scrapbook layout. PLUS, use this link to download a workshop guide giving you all you need to know to make an additional 3 layouts and 4 cards!


Have fun creating!

Michelle


#showandtellwithmichelle #scrapbooking #makeitfromyourheart

Flip Open Card

How are you today? I was feeling crafty so I made this card to share with you. It's a Fun Fold with a flip opening.  I'm using the c...