Showing posts with label distress oxide inks. Show all posts

Thursday, June 1, 2023

Botanical Shadows ~ June Stamp of the Month

Can you believe it's JUNE already? Time sure flies! A new month means a new Stamp of the Month, too. This month we have a gorgeous one called Botanical Shadows. I LOVE, LOVE, LOVE this stamp set! 

If you're not familiar with our Stamp of the Month program, here's how it works. Each month we have an exclusive stamp set only available during the month it's featured. You can buy it at retail price ($19.95) OR get it for only $5 with a qualifying order. What a deal! But it gets even better. As a VIP Customer you can get it FREE with a qualifying order! See the info below regarding our VIP Program. If you're going to buy our products why not get in on the benefits of being a VIP Customer!!!

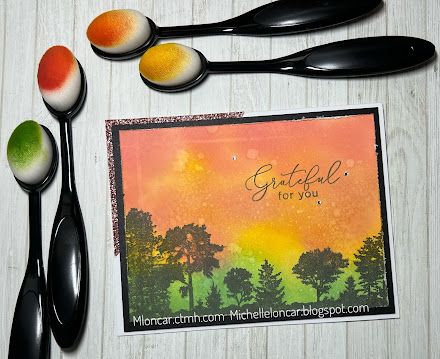
For this card I immediately imagined a glorious sunset highlighting the trees. I got out my Distress Oxide Inks ( Mustard Seed, Spiced Marmalade, Abandoned Coral and Mowed Lawn) and Blending Brushes to create the sunset. Our Blending Brushes are a fantastic way to add and blend color to your projects. 

The trees and sentiment were stamped in Intense Black Exclusive Ink. Next I used our Micro-tip scissors to distress the edge on the Sunset layer.  Then I layered the sunset onto Black Cardstock and added a corner of Desert Rose Glitter Paper. I popped up the sunset layer on Thin Foam Tape since there was a piece of glitter paper it needed to adhere to. A few Bitty Sparkles and it was complete.

Other products used for this card:


Here's a close-up showing more of the detail sprinting with water does to activate the Distress Oxide Ink. A fine mist will create a subtle look like small drops in a group. I also tapped water drops onto the ink which are the larger more individual drops. After applying the water I heated the cardstock to help dry it faster. Then I stamped the image and sentiment. 


June Stamp of the Month
Only available June 1 - 30
Get a discount with a qualifying order
As a VIP Customer you can get it FREE with a qualifying order!


If you need a Maker (consultant) I'd be happy to help.
If you'd like to BE a Maker I'd love to have you on my team!

Have you heard about our new VIP Customer Program? As a member you enjoy perks like a discount on your orders, FREE Stamp of the Month, special product bundles and online events. 

Before you go...... be sure to sign up to follow my blog so you don't miss any great ideas! The link is in the column on the right.

Michelle

#showandtellwithMichelle #ctmh #cardmaking #stampofthemonth #distressoxideink

Friday, July 22, 2022

Lighthouse Card ~ Color dare #506

Welcome to a new Color Dare Challenge! This one uses a photo as our color inspiration. With all the beautiful colors and shades in this photo I know you'll have fun creating!

When you're ready to join the challenge use the link in the post on our home page. Don't use any colors you can't see in the photo. Free colors to use are Black, white, grey and Silver. The free colors don't count as part of the "use at least 3 colors".

I loved the look of the  photo SO much I just had to create a sunset look myself! I love sunsets! The perfect stamp set for this is Ahoy There (link below).  I got out my Distress Oxide inks (Mustard Seed, Spiced Marmalade, Pickled Raspberry, Seedless Preserve, Mermaid Lagoon & Peacock Feathers), Mini Blending Tools and got busy creating that sunset! Honestly, this one was my second try. Don't be afraid to keep trying! After I had the colors blended I spritzed with some water to activate the ink and get that mottled look. 

Next up was the lighthouse. I stamped then die cut with the coordinating Thin Cut dies. Those dies make it SO easy! Using the Free color of Grey I shaded the lighthouse and rocks with a TriBlend Ice Grey Marker to give some dimension. I also popped up the lighthouse with some Thin Foam Tape. That one simple step can add a lot!

Once done stamping I added a Bitty Sparkle for the light and some Clear Shimmer Brush for the water. It looks like the glisten from the setting sun, doesn't it! To make a horizon I used a palette knife, ran the edge across the ink pad then rubbed a line where I wanted the horizon.


Color My Heart Color Dare


Inside of card

Z8024 Ahoy There + Thin Cuts
Look at all these great images! 

If you need a Maker (consultant) I'd be happy to help.
If you'd like to BE a Maker I'd love to have you on my team!

Have you heard about our new VIP Customer Program? As a member you enjoy perks like a discount on your orders, FREE Stamp of the Month, special product bundles and online events. 

Before you go...... be sure to sign up to follow my blog so you don't miss any great ideas! The link is in the column on the right.


Michelle

#showandtellwithmichelle #ctmh #scrapbooking #colormyheartcolordare


Monday, March 21, 2022

Cute Cat Card ~ Atlantic Hearts Sketch Challenge

How about a new sketch challenge? Our Design Team at Atlantic Hearts Sketch Challenge is here to give you a head start on your next project!

Use our sketch for any project you like. Flip it, rotate it, use it any way you like as long as we can still see the sketch in your project.

For my card I decided to go with some Distress Oxide Ink stenciling. To make card making easy I always keep our White Cards & EnvelopesValue Pack on hand.  I started with a piece of White Daisy cardstock and the stencil. Using Distress Oxide Inks (Peacock Feathers, Mermaid Lagoon, Seedless Preserves) and the Mini Blending Tools I created a fun background. Once done I used a fine mist of water to activate the ink making it bleed a bit.  

I used cardstock layers (Lagoon, Raspberry, Carolina, Grape) for the rest of the card front. HEY! Did you know we're having a Cardstock Carnival? You can get our beautiful cardstock in bundles of colors, individual colors or even a bundles of ALL the colors! Check it out here! 


Inside of card

Atlantic Hearts Sketch Challenge

The stencil I used is on the top right. I cut the 4 squares apart so  I could easily use the patterns alone.  This is a great pack of stencil with so many different designs! 
Z4338 Stencil Pack #7

For the image I went with the cat from our current Stamp of the Month set. This set is so cute with lots of fun saying coordinated to the animal. Just think of all the occasions this set will cover!

S2203 You're the G.O.A.T
March Stamp of the Month
Available March 1 - 31, 2022


If you need a Maker (consultant) I'd be happy to help.
If you'd like to BE a Maker I'd love to have you on my team!

Have you heard about our new VIP Customer Program? As a member you enjoy perks like a discount on your orders, FREE Stamp of the Month, special product bundles and online events. 

Before you go...... be sure to sign up to follow my blog so you don't miss any great ideas! The link is in the column on the right.


Michelle

#showandtellwithmichelle #ctmh #cardmaking #atlanticheartssketchchallenge

Tuesday, July 20, 2021

Beautiful Butterfly Card

I couldn't wait to share this card with you all! It was simple to make but carries such an impact! 

I started by cutting a stencil using the Layered Butterfly Thin Cuts. Once cut I used Distress Oxide Inks to color the butterfly shape from the stencil and spattered with a water brush to activate the ink. 

Then it got really easy! I stamped in black some flowers from the Isabella Scrapbook Set, die cut a smaller butterfly in Majestic Holographic paper and added some Bitty Sparkles. Then I decided I wanted to doodle a border to finish the look. 


Layered Butterfly Thin Cuts


Other Close To My Heart products used for this card.
  • White Cards and Envelopes Value Pack
  • Stamp Set: Every Bit of Wonderful (inside sentiment)
  • Cardstock: White
  • Specialty Paper: Majestic Holographic paper
  • Exclusive Inks: Intense Black
  • Distress Oxide Inks: Peacock Feathers, Tattered Rose, Seedless Preserves
  • Embellishments: Bitty Sparkles, Clear Sparkles
  • Tools: Mini Blending Tools, Journal Pen

If you need a Maker (consultant) I'd be happy to help.
If you'd like to BE a Maker I'd love to have you on my team!

Have you heard about our new VIP Customer Program? As a member you enjoy perks like a discount on your orders, FREE Stamp of the Month, special product bundles and online events. 

Before you go...... be sure to sign up to follow my blog so you don't miss any great ideas! The link is in the column on the right.


Michelle

#showandtellwithmichelle #ctmh #cardmaking

Friday, July 2, 2021

Butterfly Card ~ Color Dare #451

 It's time for a new color challenge and you've come to the right place! Color My Heart Color Dare has a new challenge each Friday that's open for 2 weeks. Here is are newest challenge!

For the Crazy 8 Challenge we give you a grid with 8 different options. You must you at least 4 of those options, but can use more, to create any paper craft you like. Don't add any extra things to the grid though.

I decided to use our brand new Thin Cut die called Butterfly Background. It creates a stunning look no matter how you use it! 

Using distress oxide inks I created a background of color (Lagoon, Smoothie, Sapphire and Candy Apple).  The Black comes from the Neutrals block and the sparkles from the Embellishment block. So I ended up using 6 of the 8 blocks in the grid!

If you're not familiar with distress oxide inks they are SO fun! You can use them like any other ink but when spritzed with water it activates the ink and leaves a distressed look to it. Using a spray will create a subtle look. I tapped a water brush on my finger to get this look. 

Since I blended a larger area than needed for one card..... I made two! I love how each looks so different just by reversing the pieces. 


Here you can see the spots where water hit the ink. I love this look!


On this one you see the color peeking through the cut out spots. You can also see the water spots.


Butterfly Background Thin Cut

Other Close To My Heart products used for the cards.
  • White Cards and Envelopes Value Pack
  • Cardstock: White Daisy, Black
  • Distress Oxide Inks: Peacock Feathers, Abandoned Coral, Candy Apple, Chipped Sapphire
  • Clear Sparkles, Bitty Sparkles
  • Water Brush
If you need a Maker (consultant) I'd be happy to help.
If you'd like to BE a Maker I'd love to have you on my team!

Have you heard about our new VIP Customer Program? As a member you enjoy perks like a discount on your orders, FREE Stamp of the Month, special product bundles and online events. 

Before you go...... be sure to sign up to follow my blog so you don't miss any great ideas! The link is in the column on the right.

Now it's your turn to join the challenge. We can't wait to see what you create!


Michelle

#showandtellwithmichelle #cardmaking #ctmh #colormyheart #colordare

Wednesday, November 11, 2020

Distress Oxide Inks Techniques and Ideas!


Distress Oxide™ Ink Techniques and Ideas!

Distress Oxide™ Ink Techniques #ctmh #closetomyheart #distressoxideinks #distressoxidetechniques #cardmaking #scrapbooking #papercrafting

We’ve added Distress Oxide™ ink pads to our ink line-up not too long ago, and today we’ve got a few ideas to show you on how to use them!

Hopefully you’ve all had a chance to experiment with these fun reactive inks and, in the process, discovered a few techniques and ideas of your very own. If you haven’t, we are here to help! Regardless of where you are in your Distress Oxide journey, follow along as our Creative Arts Manager, Karen Pedersen, dives into five gorgeous techniques below!

Splattered Background
Apply Distress Oxide ink with a blending tool, splatter with water, and dab with a dry paper towel. Follow up with a splatter of watercolor.

Distress Oxide™ Ink Techniques #ctmh #closetomyheart #distressoxideinks #distressoxidetechniques #cardmaking #scrapbooking #papercrafting

Reacting with a Shimmer Brush
Emboss your image and color with 
Distress Oxide™ inks. With a Clear Shimmer Brush, go over some of the inked areas, removing ink and adding shimmer as you go.

Distress Oxide™ Ink Techniques #ctmh #closetomyheart #distressoxideinks #distressoxidetechniques #cardmaking #scrapbooking #papercrafting

Watercolor Wash
Load your watercolor paper with water, to the point where it is sitting on top of the paper and not fully absorbing. Spread the 
Distress Oxide™ ink colors that you wish to use for your background onto your all-purpose mat. With a waterbrush, pick up the colors, one at a time, and add it to the sitting water on the watercolor paper. The colors will blend and bleed into one another.

Distress Oxide™ Ink Techniques #ctmh #closetomyheart #distressoxideinks #distressoxidetechniques #cardmaking #scrapbooking #papercrafting

An Ombré Effect with One Ink Pad
With just one 
Distress Oxide ink pad, create and ombré effect by applying the ink with different amounts of pressure (more for a darker tone, and less for a lighter tone). Blend these tones seamlessly with a mini ink blending tool.

Distress Oxide™ Ink Techniques #ctmh #closetomyheart #distressoxideinks #distressoxidetechniques #cardmaking #scrapbooking #papercrafting

Tone-on-Tone Stenciling
Apply the background 
Distress Oxide™ ink colors and blend them into each other with a mini ink blending tool. Lay a stencil on top and add a second layer of color through the stencil. Apply more pressure, and more ink, for the stenciled image to appear darker and to achieve a more dramatic effect.

Distress Oxide™ Ink Techniques #ctmh #closetomyheart #distressoxideinks #distressoxidetechniques #cardmaking #scrapbooking #papercrafting

What are some fun ways you are using your Distress Oxide™ inks? Let’s share ideas in the comments below!

Distress Oxide™ Ink Techniques #ctmh #closetomyheart #distressoxideinks #distressoxidetechniques #cardmaking #scrapbooking #papercrafting

Ready to jump on the Distress Oxide bandwagon? Check it out on my website.

Michelle

What's Up Wednesday ~ Adopt a Pet ~ January 2026 Kit

Here is the Adopt a Pet Kit introduced in January. It is SO cute and would be fun to make with kids. My job as Kit Ambassador for our Team w...